I’ve always been a huge fan of space exploration. I always wanted to be an astronaut growing up! That didn’t work out but I still love looking out into space. Which is why its strange I’ve never really gotten into stargazing. I did have a telescope as a kid – probably a Tasco 851TR which was a 60 x 900mm refractor. It was a pretty basic telescope but probably could have given me some half-way decent views of the solar system if I’d had any idea how to use it. Unfortunately, I didn’t! My dad didn’t either. We could find the moon but finding anything else was pretty much impossible since he didn’t know how to set up the finder scope.
Then during COVID, I started thinking about getting a telescope but I wasn’t really sure what to do so I started off with a pair of Celestron 20×80 SkyMaster binoculars. Those have been great! I’ve taken them to darker places than where I live and we’ve seen some really beautiful views of the sky (even if I didn’t always know what we were looking at). They also opened up the views of the solar system. At 20x magnification, they didn’t have enough power to reveal things like Saturn’s rings but you could look at Jupiter and see its moons very easily and I got some good views of the moon. But I’d been looking at telescopes recently and had one on my Amazon wishlist and it arrived as a birthday present, lucky me!
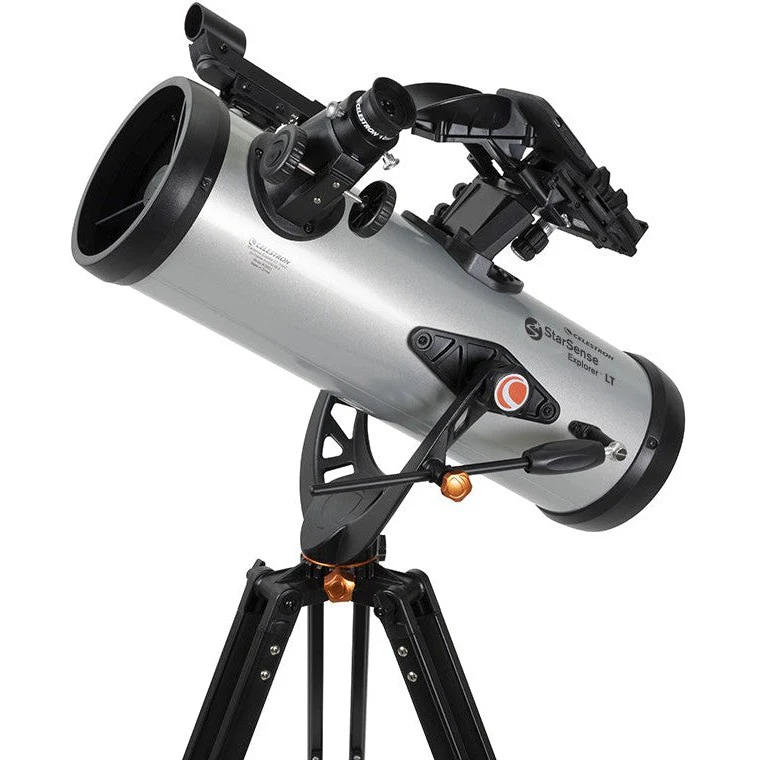
Telescope Overview
So what is it? As the title suggests, its a Celestron StarSense Explorer LT 114AZ. I really wanted a reflector since they tended to have larger apertures than refractors and avoid things like chromatic aberration. As a total novice, this seemed like a good telescope from the specs. It has a 114mm aperture and a 1000mm focal length, which would imply decent capabilities. As it turns out, this was NOT exactly what I thought it was.
It is a reflector but the length of the telescope is only about 500mm. After doing more research, it turns out that inexpensive telescopes (like this one) tend to use a spherical mirror rather than a parabolic one. Parabolic mirrors can focus their light more accurately but require longer tubes.
Spherical mirrors can’t focus as well and to correct for that, there is an additional lens in the focusing tube to correct the telescope’s vision. This corrective lens also effectively doubles the focal length of the telescope, turning the 500mm scope into the equivalent of an 1000mm scope. This is often called a “Jones Bird” reflector. So what are the pros and cons of this?
Pros:
- The telescope is much shorter
- The telescope is lighter
- Its easy to transport & store
Cons:
- The best views will be directly in the middle of the eyepiece
- The telescope is slightly more difficult to collimate (but also, its not hard)
If you go looking for reviews / suggestions on “serious” astronomy websites, they will all tell you that you shouldn’t get a telescope like this because the optics aren’t as good as a parabolic mirror. What they will also tell you is that if you want to buy a telescope in the price-range of this telescope, not to bother. Either go spend more money on a Dobson-mounted telescope. Dobson is a type of mount that requires a table or other surface to put it on. Which, in my opinion, means you don’t have a stand. Or just advise to go buy binoculars.
So, what should you do? One option is just spend more money. Personally, I wasn’t ready to spend over $200 for a telescope (and even though it was a gift…it was just picked off my wishlist for my birthday. I would have purchased it myself at some point). And in my experience in other hobbies, what aficionados consider low-end vs what the general public would consider low-end is VERY different. $200 is not cheap. So, you can learn how to use this style of telescope. Which is exactly what I did.
First, We Collimate
The first thing you should do when you buy a reflector is buy a collimation tool to help you align the primary mirror. I got a laser collimator for $20. It doesn’t matter if you have a cheap or expensive reflector, you’ll need to do this. There’s various ways to do it but $20 for the laser tool to make it easy seemed the way to go for me.
That’s not what I did. I just I used my telescope for about a month without collimating it. And the views were fine. The moon is always easy for any scope so the views there were pretty good. I could see Jupiter with its moons and I got some good views of Venus that really showed off the phases. BUT! I could tell that there was a limit to the sharpness I was getting that seemed to really stand out on Jupiter. I could see hints of the cloud bands but not very well. At the maximum magnification I was using (166x), I should have been able to see at least the 2 big bands pretty well.
And this is where some of the complaints about this design start. Normally, to collimate a reflector, you drop the laser into the focus tube and adjust the mirror with some screws on the back. It takes just a few minutes at most. To collimate this one takes a bit more and originally, I was a bit intimidated by it. But when I realized that the scope wasn’t giving me the best possible view it was capable of, I decided to try.
This involved some minor disassembly of the scope. First you remove the focusing tube. On the bottom of the tube is a piece that holds in the corrective lens. This has to come out in order to calibrate the telescope with the laser. But the housing is a single piece that simply unscrews from the focus tube. Then you just set it aside and put the tube back into the telescope and put it back together without the corrective lens in.
Without the lens, you can use the laser collimator. Basically it bounces a laser off the mirror inside the telescope and the mirror bounces it back. The goal is to get the dot of the laser into the middle of the target. The telescope is designed to do this. There are 3 adjustment knobs on the back of the mirror for this exact purpose. You take out the 3 screws locking them into place and then just start turning the knobs, watching the dot move, until its in the middle. That’s the easy part. If this didn’t have the corrective lens, it would take almost no time at all.


Once everything was aligned, I locked it into place (while keeping the laser on since things moved while I did it) and then I had to put the corrective lens back in. Disassembly, alignment, and reassembly took me 15 minutes. This included finding a CR2032 battery for the laser and having never done it before. This would be hard to do in the field after setting up the telescope but not impossible either. Celestron even included a tool to help remove the corrective lens. They obviously intend for people to do this.
Views
Now that I’ve aligned everything, I took it back outside. I live in an urban environment with the highest levels of light pollution on the chart. I also have a tiny backyard hemmed in my tall buildings and trees. My view of the sky is AWFUL. There just isn’t much I can aim my scope at. Jupiter is my current favorite target and I think does a great job of highlighting what this scope is definitely good at.
I got some halfway decent views before adjusting the scope. Afterwards? I was blown away. The telescope comes with two eyepieces – a 25mm and a 10mm. Both are a style of lens called a Kellner. Don’t ask me to explain further because I can’t tell you! But the smaller the lens, the higher the magnification. You take your focal length and divide by the eyepiece. So a 25mm gives you 40x in this scope and the 10mm gives you 100x. I also have purchased an additional 6mm eyepiece that gives me 166x magnification.
The fun part of a telescope like this is learning what eye pieces are best for which situations. For distant objects in space, you usually want a lower power eye piece. For planets, you want to go as high as possible. A big reason for this is that clusters and galaxies are actually pretty large objects. The Andromeda galaxy actually takes up 6x as much space in the sky as the moon. If you live somewhere dark enough you can see it as a smudge in the sky. Zooming in on it doesn’t matter as much as collecting as much light as possible.
Because of where I live, I haven’t been able to fully test the telescope on deep space objects. I suffer from light pollution that is 8 or 9 on a scale of 9. In addition to that, my tiny back yard is hemmed in on all 4 sides by buildings and trees. So I can only view a very small part of the sky. There’s also a small area of the sky directly up that the telescope can’t reach, further constraining my viewing opportunities. But I’ve still gotten a good look at some some things up in space!
At low power (40x magnification) I’ve looked at a few DSOs and they’ve look really nice through the scope. I’ve looked at the Beehive Cluster and Pleiades which both really showed up well in the eye piece. The Pleiades are always beautiful to look at. I’ve also found the Orion Nebula and Hyades. Everything has looked bright and sharp through the eye piece.
I’ve spent the most time looking at Jupiter though and I think its really helped me find the strengths and weaknesses of the scope. At 40x, the view is quite similar to what I’ve seen through my binoculars. Jupiter itself is clearly a disc rather than a point and the 4 Galilean moons are easily visible. But there are no details visible on Jupiter itself.
Moving up to 100x, this is really where the scope started to shine on planetary viewing. The disc of Jupiter was very clear and, while it was small, I could see two distinct lines across the planet in the north and south where the darker zones are.
Instead of using the barlow that came with the telescope to get a better zoom, I actually purchased another eye piece. There is a line of eye pieces called “gold lines” that are sold under lots of different brand names that are considered good value for money so I purchased a 6mm to give me a magnification of 166x. The views here were still nice and crisp! At this magnification, Jupiter was big. It was obvious I was looking at a planet. The two dark stripes were much more obvious as well. Unfortunately my viewing times didn’t coincide with the Great Red Spot being visible but I’m hoping to get a view of that sometime soon.
I think its REALLY important to set expectations of what you’re going to see. Don’t expect a colorful, huge view of Jupiter. This isn’t the James Webb Space Telescope or a mountain-top observatory. This is about what you can expect to see of Jupiter at 150x. In my case, the contrast is slightly worse than this so the lighter regions are much brighter. But this is pretty close to what I can see:

I’ve also looked at both Mars and Venus. Even before collimating, my 5 y/o looked and immediately said “Why is it only a half circle?” So it was still good! But since I’ve adjusted things, Venus really looks neat through the eyepiece and you get a really sharp view of the phases.
Mars has been tough just because of how high in the sky it is right now. It’s very clearly a disk but once its in a better spot, I want to spend some time looking at it and seeing if I can spot Deimos. Uranus is another planet I plan to look for over the next week or so.
As far as looking at the moon, its a fun and easy target to look at. After I collimated the mirror, I found the views very crisp. At 166x it feels like you’re hovering right over the moon!
At this point I’m very happy with the equipment I have. The barlow that came with the scope isn’t great and I don’t know that I’ll get much use out of it. The telescope has a 114mm aperture so its max theoretical magnification is around 230x. So the barlow pushes the 10mm eye piece to 200x which would probably be doable with planetary viewing but I need a better 2x Barlow for that and honestly 166x is probably close to the max of what the scope should do unless I have absolutely perfect conditions anyway.
Viewfinder & StarSense
A telescope isn’t much good if you can’t aim it. This telescope has 2 different ways to aim. First it has a viewfinder. The one that comes with this one is a red dot viewfinder. Basically it shines a laser on a plastic film that you line up with what you want to see. And if the viewfinder is aligned properly to your telescope, you’ll see it in the eye piece. That was always the problem on my telescope as a kid. We had no idea how to align the finder scope.
The red dot finder is REALLY easy to align. Pick something, during the day, that’s pretty far away. There’s some big cranes by the port that are at least a mile from me so they’re perfect. Find the thing in your telescope. In my case I put a the corner of the crane in the center of my telescope’s eye piece. Then look through the viewfinder and see where the dot is. There are knobs to move the dot until its on the point you have centered.
I’ve found this to be VERY effective. This is really useful for things you can see in the sky like planets or very bright stars. In darker places, you could use it to aim at visible objects like M31. My only complaint is that the knob to turn it on is near one of the adjustment knobs and I have accidentally turned the wrong one in the dark. Once you’ve done that, its a pain to fix at night. The only way you can really do it is to find Polaris and use that.
The telescope comes with something called StarSense that gives it a really neat trick though. I thought it was going to be a gimmick and didn’t set it up immediately but I was wrong to do that. Basically, you can mount your phone on a special mount that’s part of the telescope and after going through an alignment process, it can help you point the telescope at different things in the night sky. It does this by using a mirror to see the sky and figure out what the telescope is aimed at.
I didn’t think this would work…but it works. There are people who buy these telescopes just to take the StarSense mount off and put it on more expensive telescopes. Its not useful for finding things you can see with the red dot finder but it is VERY useful for finding things you can’t see. In my back yard, I can barely see anything with just visual spotting. So finding DSOs in the red dot finder would be impossible. But every DSO I’ve seen has been with the telescope helping me find it. This has totally changed stargazing for me.
With my binoculars I just aimed at the sky and saw stuff with no idea what I was looking at. Now, I can go looking for things. Its REALLY cool. My only complaint is that the mount doesn’t stay aligned when using it so I haven’t gotten it perfect yet. But its really really close. A little more messing with it and I think I’ll have it almost exact. With DSOs at low magnification this doesn’t matter that much but looking for dim planets like Neptune & Uranus are a little harder since I’d rather be at a higher magnification (which means a narrower patch of sky to see).
Tripod & Mount
The telescope itself has a very simple mount called an alt-azimuth mount. All that means is that the mount moves left/right and up/down. It also has a single adjuster to move the altitude slowly up and down once you’re looking at something. The upside of this design is that its really easy to use. The downside is that things won’t stay in the eye piece for very long so you’ll be adjusting the telescope frequently. But the alternate type of mount (equatorial) is much more difficult to use and having had one in the past, I much prefer this for now.
I found the mount easy to move around if you are gentle with the scope. This is definitely where the inexpensive nature of this telescope really stands out. When you tighten the knobs to lock the telescope in place, there is a chance it will move slightly. In my experience, the best thing to do is only tight one of the two knobs on the the altitude as well as the knob on the slow-motion control. As for the azimuth knob, I usually leave it loose because if you’re using the telescope correctly, you’re not going to cause it to move while you’re viewing unless you want to move it (and I often need to adjust while viewing).
The tripod itself is also not wonderful but it does the job. A really nice tripod could easily cost as much or more than this telescope so expecting too much here isn’t realistic. With that said, the tripod works for this scope. The scope is pretty light so having a lightweight tripod is fine. Once I’m done moving the telescope to my target, it doesn’t wobble unless I’m interacting with it. Once I take my hands off of it, the views are stable.
While these components could be better…they haven’t negatively impacted my ability to use the telescope so I have no real complaints here. In the case of the mount, I find it very easy to use so its been great for me.
Included Eye Pieces
I know nothing about the different types of eye pieces other than there are different types of eyes pieces. The ones that come with this telescope are both Kellner eye pieces but more important to me is that one is a 25mm and one is a 10mm. With the focal length of this telescope being 1000mm, that gives 40x and 100x magnification. The Barlow that’s included with the telescope is a 2x Barlow lens which means you can also get 80x and 200x magnification with the included eye pieces.
Now, my experience so far with the included eye pieces is that they seem to be of a good quality. The only thing I have to compare them with is the additional eye piece I’ve purchased. From a construction standpoint, the included eye pieces are much lighter than the Astromania one which implies that the housings are plastic vs the Astromania one being clearly made of metal.
Does that matter? I have no idea! The image I can see through the included eye piece is nice and sharp so it just doesn’t seem to matter to me what they’re made of.
Final Thoughts
I’ve only had this telescope for about a month and I haven’t really put it fully through its paces yet given my limited viewing opportunities. I think to really understand what I can see through this scope I’ll need to use it for almost a year. I won’t be able to see Saturn until the fall and that’s something I really want to see. Mars hasn’t been in a good position yet for me to observe and I’m really curious what I will be able to see. I also need to take it somewhere much darker than where I’m at so I can try finding some of the DSOs that that this instrument can handle.
With that said, I’ve seen great views of three planets, the moon, some stars (including a trinary system!), open clusters, and a nebula where I got a good view of the gas clouds. Not bad for where I’m at.
If I had $500+ to spend, would I buy this? No, I’d invest in a telescope with a parabolic mirror. The ceiling on something like that would be much higher. But this telescope is usually well under $200. Right now I could go buy it for $175 on Amazon. And I have just not been able to find a telescope for that price that can provide the views that this one can. For the type of very casual viewing I do, the views through here are great. As long as you’re willing to collimate the telescope (which you HAVE to do with any reflector, no matter the price) then you’re going to be treated to good views. And the StarSense app is an awesome tool.
Discover more from Running in Paradise
Subscribe to get the latest posts sent to your email.